Blog
24V to 12V Step-Down Converter: Installation Guide for Trucks, Buses, and Heavy Equipment
24V to 12V Step-Down Converter: Installation Guide for Trucks, Buses, and Heavy Equipment
24V to 12V Step-Down Converter: Installation Guide for Trucks, Buses, and Heavy Equipment
📅 Updated: April 2026 | ⏱ 10 min read | 🔧 Vehicle Electrical Systems
Heavy-duty trucks, buses, construction equipment, and agricultural machinery typically operate on a 24V electrical system. However, many essential accessories—dash cameras, CB radios, GPS trackers, USB chargers, LED lights, and refrigeration units—are designed for 12V. Directly connecting a 12V device to a 24V battery will instantly destroy it. That’s where a 24V to 12V step-down converter (also called a 24V to 12V DC-DC converter or voltage reducer) becomes essential. In this guide, we’ll walk you through how to choose the right converter, step-by-step installation instructions for trucks and heavy equipment, wiring diagrams, and critical safety tips to ensure reliable, long-lasting performance.
What Is a 24V to 12V Step-Down Converter?
A 24V to 12V step-down converter is a switching power supply that takes an input voltage of 20–30V DC (typical 24V truck system) and produces a stable, regulated 12V DC output. Unlike a simple resistor or linear regulator that wastes energy as heat, a DC-DC buck converter uses high-frequency switching to achieve efficiencies of 90–96%. This means minimal heat generation, smaller size, and no need for massive heatsinks—ideal for the tight, vibration-prone spaces in heavy vehicles.
Most step-down converters used in trucks and buses are non-isolated (common ground) because the chassis serves as the return path for both 24V and 12V circuits. However, isolated converters are available for applications requiring ground separation or noise isolation.
💡 Key Fact: Most 24V vehicle electrical systems actually run between 26V and 29V when the engine is running (alternator charging). Your converter must be rated for at least 30V input to handle these voltage spikes.
How to Choose the Right 24V to 12V Converter for Your Vehicle
Selecting the correct converter is critical for safety and performance. Consider these factors:
- Power rating (watts/amps): Add up the current draw of all 12V devices you plan to run simultaneously. For example, a dashcam (0.5A) + CB radio (1.5A) + LED light bar (5A) = 7A. Choose a converter with at least 20% headroom (e.g., 10A or 120W). For heavier loads like a 12V fridge (5–8A) or auxiliary lighting, a 20A (240W) converter is common.
- Input voltage range: Look for a converter rated for 18–32V DC or wider. This ensures it handles engine start/stop voltage dips (down to 18V) and alternator spikes (up to 30V+).
- Environmental protection: Trucks and heavy equipment operate in dusty, wet, and vibrating environments. Choose a converter with an IP67 or IP68 waterproof rating if mounted externally, or at least IP54 for under-dash mounting. Also, look for epoxy-filled or potted converters for vibration resistance.
- Protection features: Overload, over-temperature, short-circuit, and reverse polarity protection are essential. Some models also include low-voltage cutoff to prevent draining the starter batteries.
- Isolated vs. non-isolated: Non-isolated is standard and cost-effective for most truck applications. Isolated converters are used when you need separate ground references (e.g., for sensitive communication equipment).
⚠️ Critical Safety Note: Never use a 24V to 12V converter that does not have over-temperature or short-circuit protection. A failed converter can cause a fire or damage your vehicle’s electrical system.
Tools and Materials Needed
- 24V to 12V step-down converter (appropriately rated)
- In-line fuse holder with fuse (rated for converter’s max input current)
- Appropriate gauge wire (see table below)
- Ring terminals (for battery connections)
- Wire crimpers, strippers, heat shrink tubing
- Multimeter
- Zip ties and wire loom for cable management
- Drill with bits (if mounting to chassis or panel)
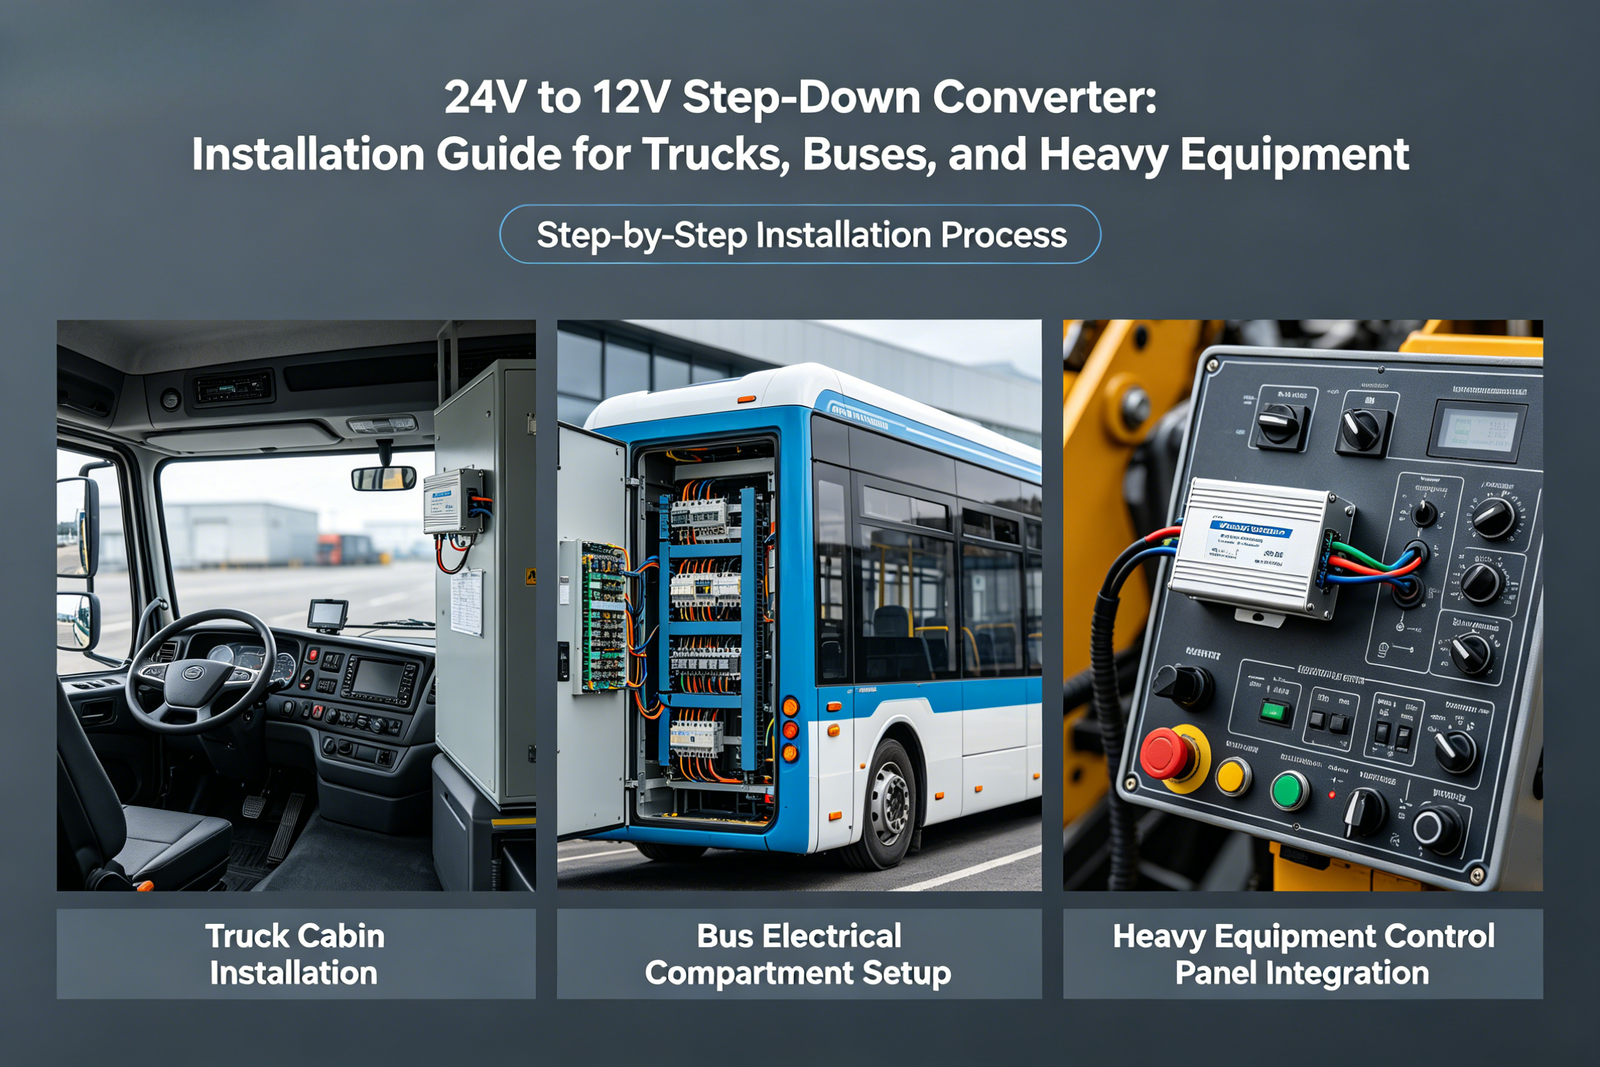
Step-by-Step Installation Guide
Step 1: Choose a Mounting Location
Select a dry, well-ventilated location close to the battery or fuse panel. Common spots: under the dashboard, inside a side compartment, or in the engine bay (if converter is waterproof). Avoid direct heat sources (exhaust, turbo) and areas prone to water splashes. Ensure the location allows for easy wiring access to the 24V battery and 12V distribution block.
Step 2: Disconnect the Battery
For safety, disconnect both positive and negative terminals of the 24V battery system (or use the main battery disconnect switch). On trucks with dual batteries, ensure both are isolated. Wear insulated gloves and use insulated tools.
Step 3: Mount the Converter Securely
Using the mounting holes on the converter, attach it to a solid surface with screws or bolts. For vibration-prone vehicles, use rubber grommets or vibration-damping mounts. Do not mount the converter with the wiring terminals pointing upward (to avoid moisture ingress).
Step 4: Wire the Input Side (24V)
Connect the input positive wire (red) to the 24V positive terminal (or a switched 24V source if you want the converter to turn off with the ignition). Install an in-line fuse holder as close to the battery as possible (within 12 inches). For most 10A–20A converters, a 15A–25A fuse is appropriate. Connect the input negative wire (black) to the vehicle chassis ground or directly to the battery negative terminal. Use ring terminals and crimp securely.
Step 5: Wire the Output Side (12V)
Connect the output positive (yellow or red) to your 12V distribution block or directly to the 12V device. Connect the output negative (black) to the same chassis ground as the input negative (non-isolated converter) or to a separate ground for isolated units. If you are powering multiple devices, install a small 12V fuse block to protect each device individually. Use appropriate wire gauge based on output current (see table below).
Step 6: Secure and Protect Wiring
Route wires away from moving parts, sharp edges, and hot surfaces. Use wire loom or split conduit to protect against abrasion. Secure with zip ties every 12–18 inches. Ensure no tension on the converter terminals.
Step 7: Test the Installation
Reconnect the battery. Use a multimeter to verify input voltage (24V+) at the converter’s input terminals. Then measure the output voltage—it should be between 12.0V and 13.8V (some converters are adjustable). Connect a test load (e.g., a 12V work light) and verify it operates correctly. Check for excessive heat after 10 minutes of operation.
Wire Gauge Recommendations
Using undersized wire causes voltage drop and overheating. For typical runs under 6 feet (2 meters):
- Up to 5A output: 18 AWG input and output
- 5A–10A output: 16 AWG input, 18 AWG output
- 10A–20A output: 14 AWG input, 16 AWG output
- 20A–30A output: 12 AWG input, 14 AWG output
- 30A–40A output: 10 AWG input, 12 AWG output
For input current, remember: Iin ≈ (Iout × Vout) / (Vin × efficiency). For a 20A output at 12V, with 24V input and 90% efficiency, input current ≈ (20×12)/(24×0.9) ≈ 11.1A. Always fuse for the calculated input current.
🔧 Pro Tip: Many modern trucks and buses have a dedicated auxiliary 24V power distribution panel. Connect your converter to a switched source (e.g., ignition) so it only runs when the vehicle is on, preventing battery drain. Use a relay if needed for higher-current converters.
Common Applications in Trucks, Buses, and Heavy Equipment
- Dash cameras & telematics: 12V dashcams and GPS trackers keep fleets safe and monitored.
- CB radios & two-way radios: Most mobile radios operate on 12V; a clean 12V supply reduces alternator whine.
- LED work lights & backup lights: High-power LED bars (100W+) require stable 12V.
- USB charging ports for drivers: Modern USB-C PD chargers need 12V input.
- Refrigeration units: Small 12V coolers/fridges for over-the-road drivers.
- 12V monitors and entertainment systems: For bus passenger displays or truck infotainment.
Troubleshooting Common Issues
- No output voltage: Check input fuse, verify 24V presence, ensure ground connections are clean and tight. Some converters require a minimum load to regulate; test with a known load.
- Output voltage too low (e.g., 10V under load): Input voltage may be dropping due to undersized wires or poor connections. Also, the converter may be overloaded (current limit).
- Converter gets very hot: Ensure adequate airflow; derate output if mounted in a hot engine bay. Check that the load current does not exceed the converter’s rating.
- Electrical noise on radio: Add an EMI filter or use an isolated converter. Ensure input and output wires are not running parallel to antenna cables.
- Converter fails intermittently: Vibration may have loosened connections. Use threadlocker on mounting screws and ensure terminals are torqued properly.
Frequently Asked Questions
Can I connect multiple 12V devices to one step-down converter?
Yes, as long as the total current draw does not exceed the converter’s rated output. Use a fuse block to protect each device individually.
Do I need a fuse on the output side?
Yes. While the converter has internal overcurrent protection, a fuse at the output protects the wiring and devices. Size it slightly higher than the maximum expected load.
Can I use a 24V to 12V converter to charge a 12V battery?
Only if the converter has an adjustable output and can be set to 13.8–14.4V. Most standard converters output a fixed 12V (or 12.5V) and are not battery chargers. For battery charging, use a dedicated 24V to 12V DC-DC charger with a proper charge profile.
What happens if I connect the converter backward?
Most quality converters include reverse polarity protection and will not be damaged. Cheap converters may blow an internal fuse or be destroyed. Always double-check polarity before connecting.
Conclusion: Reliable 12V Power for Your Heavy Vehicle
Installing a 24V to 12V step-down converter is a straightforward upgrade that allows you to safely power 12V accessories in trucks, buses, and heavy equipment. By choosing the right converter size, using proper wiring and fusing, and following the installation steps above, you can enjoy reliable 12V power for years. Always prioritize safety: disconnect batteries, fuse at the source, and protect wiring from abrasion and heat. Whether you’re adding LED lights, a dashcam, or a refrigeration unit, a quality DC-DC converter ensures your 12V devices run smoothly without draining or damaging your 24V electrical system. © 2026 Power Electronics Guide – Your resource for 24V to 12V step-down converters, vehicle power solutions, and heavy equipment electrical installations.